
Making the switch from an iPhone to an Android device can seem daunting—but it doesn’t have to be. This guide walks through every possible method to move data, contacts, photos, messages, music, apps, and more from iOS to Android. Whether you’re using cables, wireless tools, cloud services, or third-party apps, you’ll find step-by-step instructions and tips throughout.
The latest Android release delivers a suite of enhancements that boost usability, performance, and security. Google has packed this update with features that streamline daily tasks, protect personal data, and offer finer control over the device experience.
Why switch from iOS to Android? What are the benefits, features and User experience?
iOS users should consider switching to Android for the flexibility, customization, and broader range of features it offers. Unlike iOS, Android allows users to personalize everything from home screen layouts and widgets to default apps and system themes, giving a truly tailored experience.
Android 16 now also integrates more openly with third-party apps and services, supports file sharing without restrictions, and allows side-loading of apps for greater freedom. Additionally, improvements in privacy, regular security updates through Google Play, and enhanced multitasking tools make modern Android both secure and productivity-friendly. For users seeking more control, value, and versatility, Android provides a compelling alternative to iOS.
This also means migrating from iOS to Android is a breeze using ‘Switch to Android‘ app. With Android 16 launched in June 2025, more users are expressing a desire to enjoy to customisation Android provides. Android OS is also more developer friendly, with majority of student developers begin with coding Android apps. Whatever the reason, if you are switching from iOS to Android, follow the steps below.
Pre‑Transfer Prep: Things to Do Before Migrating
It’s important to backup your data in iPhone to keep a copy of the data if the migration goes wrong. You can use iCloud to back up and then delete the backup once the data is moved.
Backup Your iPhone
-
Use iCloud or iTunes/Finder to create a full backup.
-
Ensure apps like WhatsApp are backed up within the app’s settings (e.g., Chats → Chat Backup).
-
Keep your iPhone handy during the transfer—some methods require the original device.
Turn Off iMessage & FaceTime
Go to Settings → Messages and toggle off iMessage; then Settings → FaceTime to disable it. This prevents SMS messages from getting stuck in Apple’s messaging system.
Check Storage & Remove Lock Screen
Confirm your new Android device has enough free space for iOS to Android data transfer. Temporarily set Auto‑Lock on iPhone to “Never” to keep it active during USB transfers.
Wired Transfer (Lightning → USB‑C or USB‑C → USB‑C)
The fastest and most complete way to migrate from iOS to Android:
-
Power on your new Android phone and follow the setup wizard.
-
When prompted about transferring data, choose the iPhone option.
-
Connect the two phones with:
-
Lightning → USB‑C (for most iPhones), or
-
USB‑C → USB‑C (for iPhone 15+).
-
-
Unlock your iPhone and “Trust” the connection.
-
Select what to transfer—contacts, photos, messages, WhatsApp history, compatible apps—Let the process complete, then disconnect and continue setting up.
Pros:
-
Transfers the most content (apps, messages, settings).
-
Much faster than wireless methods.
Cons:
-
Requires compatible cable.
-
Both devices must have enough power and storage.
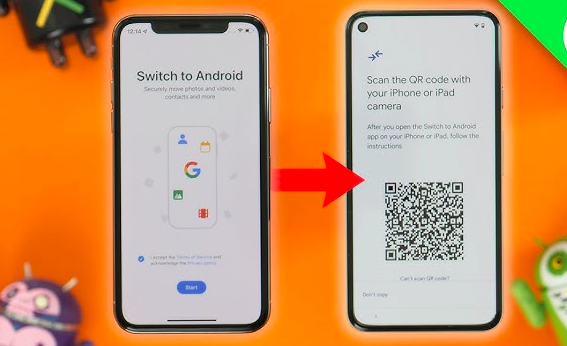
Wireless Transfer with “Switch to Android” App
Transfer the files wirelessly
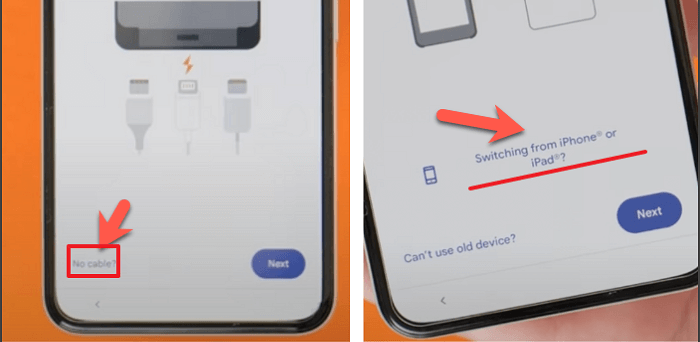
If you lack a cable or prefer wireless, many Android phones (Google Pixel, Samsung, etc.) support wireless migration:
-
Choose “No cable?” during setup.
-
Scan the QR code on your iPhone to install Switch to Android app (by Google) or Samsung Smart Switch.
-
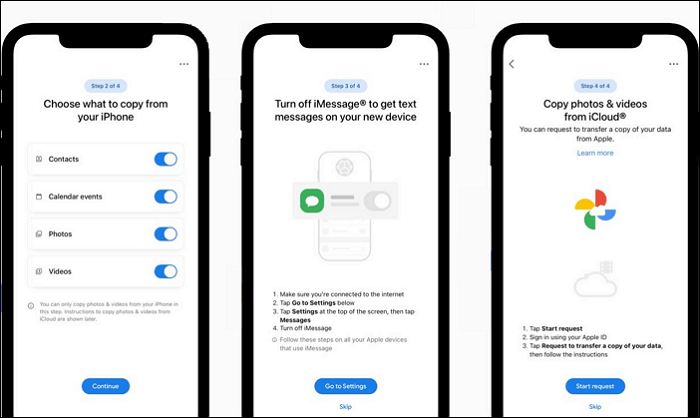
Launch the app and establish a Bluetooth/Wi‑Fi connection.
-
Select the data types (contacts, calendar, photos, videos, and messages in some cases) and start transfer
-
Continue with Android setup once complete.
Pros:
-
No cable required.
-
Works well for basic data.
Cons:
-
Excludes apps and app settings.
-
Slower, especially for media.
Cloud‑Based Transfer
For a flexible, optional backup route using cloud storage.
Google One Backup (Contacts, Calendar, Photos, Videos)
-
Install Google One on your iPhone → Menu → Settings → Sync Settings → enable desired items.
-
Later, sign into Google One on Android to sync backed‑up content.
Google Drive Backup
-
Using Google Drive, go to Menu → Settings → Backup, select contacts, calendar, and media, then tap Start backup.
iCloud→Google Photo/Drive Export
-
Use Apple’s Data and Privacy portal to request a transfer of photos and videos from iCloud to Google Photos.
-
Alternatively, manually export contacts via iCloud.com as a vCard and upload to Google Contacts.
Pros:
-
Acts as a backup independent of transfer.
-
Access your data anywhere.
Cons:
-
Doesn’t migrate apps or messages.
-
Slower, dependent on internet speed.
Third‑Party Apps & File‑Sharing Tools
There are several apps designed to transfer across platforms.
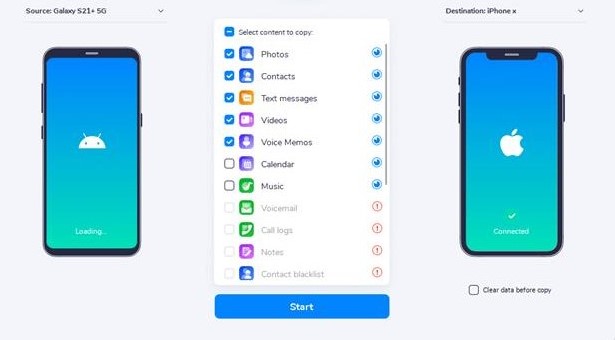
Samsung Smart Switch
Great for Galaxy owners. Supports wired or Wi‑Fi transfers from an iCloud backup or directly via cable.
Dr.Fone – Phone Transfer
A paid PC-based tool that claims to migrate contacts, messages, photos, videos, music, calendars, and even some app data .
SHAREit, Xender, FileTransfer.io, Zapya
These Wi‑Fi direct apps allow file transfer without cables or the internet. SHAREit and Xender support fast wireless transfer of photos, videos, music, and sometimes documents. FileTransfer.io allows file sizes up to 5 MB per free transfer. Zapya offers offline phone‑to‑phone data sync across Android and iOS.
Pros:
-
Don’t require a cable or computer.
-
Can move custom file types.
Cons:
-
Varying data support—most only handle media and documents.
-
Privacy depends on the app.
Manual Transfer via Computer
Classic method for music, files, and personal backups:
-
Connect your iPhone to a PC/Mac.
-
Use iTunes, Finder, or file manager to export photos, music, and other data.
-
Connect Android device; drag files into its folders (DCIM for images, Music for songs, etc.)
Pros:
-
Great for DRM-free music and documents.
-
Good fallback method.
Cons:
-
Manual and time-consuming.
-
Doesn’t migrate messages or apps.
Advanced Tips to use Android 16 features
Google redesigned the user interface to present a cleaner, more responsive layout. Visual elements now pop with improved readability, and system animations flow more smoothly, making navigation feel natural. Users can customize themes, icons, and widgets more freely, tailoring the home screens and quick settings to their taste.
WhatsApp Chat Migration
-
Android can import WhatsApp data during setup if using an official cable method.
-
Third-party tools like Dr.Fone or MobileTrans may help.
Apple Health & Fitness Data
Official Apple Health data doesn’t transfer directly. Reddit users suggest exporting via XML and using workout‑tracking apps like Google Fit, Samsung Health, Fitbit, or Strava to recreate data.
Messages & iMessage Cleanup
Ignore your iMessage conversations post-move? Make sure you’ve deregistered your phone number from iMessage via Apple’s website if you no longer have access to your old phone .
Music & DRM Content
-
Use Google Play Music Manager (now transferred to YouTube Music) to upload your music library.
-
Or transfer music manually via USB.
-
Subscriptions like Apple Music or Spotify are available on Android too—but DRM‑protected iTunes files won’t transfer.
Post‑Migration Tips for Android Newbies
-
Set up your Google Account, fingerprint, or PIN.
-
Confirm contacts, calendars, photos, and messages have transferred.
-
Redownload apps from Google Play—not everything migrates automatically.
-
If needed, switch to RCS via Google Messages for rich-text chats.
-
Explore customizable Android features and theming tools .
-
Don’t forget to erase or reset your old iPhone before selling or recycling.
Frequently Asked Questions (FAQs)
Q: What’s the best way to migrate apps?
A: Use the wired transfer method during setup for the most app compatibility. Otherwise, sync manually from Google Play.
Q: Can I transfer after setup?
A: Yes—use the Switch to Android app if your device supports post-setup transfer. Or use Google One to sync contacts, calendar, photos.
Q: Will I lose my WhatsApp chats?
A: Not necessarily. Use cable transfer or one of the specialized tools like Dr.Fone; some work via backup and restore on Android.
Q: Can I transfer Apple Watch to Android?
A: No, Apple Watch only works with iPhone. Instead, switch to an Android-compatible watch like Galaxy Watch, Fitbit, Garmin, or Google Pixel Watch.
Step‑by‑Step Summary Table
| Method | Data Range | Speed | Ease of Use |
|---|---|---|---|
| Wired transfer (cable) | Contacts, apps, messages, media, settings | Fastest | Very easy |
| Wireless via Switch app | Contacts, calendar, photos, videos, messages | Medium | Easy |
| Google One/Drive backup | Contacts, calendar, photos, videos | Varies | Simple/optional |
| Third‑party tools | Varies—some include apps and chat exports | Medium | Moderate |
| Manual via computer | Photos, music, documents | Slowest | Requires effort |
Final Checklist Before You Switch
-
Back up iPhone and disable iMessage/FaceTime
-
Charge both phones and check storage
-
Have cable or install Switch to Android/Samsung Smart Switch
-
Plan for special data: WhatsApp and health
-
Perform the transfer, then finalize Android setup
-
Reset or wipe your old iPhone
Migrating from iOS to Android is now smoother than ever. The wired method is still the most comprehensive, especially for apps and messages, while wireless and cloud options give flexibility. Third-party tools and manual transfers cover niche needs—especially for WhatsApp, health data, or legacy media.
By following this guide, you can ensure a seamless transition, keeping all your essential data intact—and explore the endless customization and app variety that Android offers.
Happy switching!
Let me know if you want help with a specific brand (Samsung, Pixel, OnePlus) or run into any errors during the migration and follow DroidUncle for more Android tips and tutorials.